
Using USB VNAs with Single Board Computers
July 12, 2019Introduction
Copper Mountain Technologies (CMT) provides Vector Network Analyzers without a built-in computer, which enables the USB VNAs to be highly compact, lightweight and operate on very low power. These characteristics allow the VNAs to interface with single board computers to work in situations with strict space limitations, and to be integrated in battery-powered systems. This App Note introduces how to set up a single board computer to work with CMT USB VNAs.
The system requirements for computers that can run CMT VNA software are:
- Windows 7 and higher,
- Linux Ubuntu 14.04 and higher, Linux Mint 17 and higher, Linux Debian 8.9 and higher
- X86 32-bit or 64-bit Instruction Set Architecture processor
- 1.5 GHz minimum processor clock speed
- 1 GB minimum RAM
- USB 2.0 High Speed
The reason why CMT does not offer a VNA software version for ARM-architecture based processors is that the VNA software takes care of all the complicated data computations and ARM processors are generally not fast enough for it. Also, note that the CMT VNA software for Linux is built with the use of Linux Wine wrapper which means it is still Windows application underneath, so it runs slower on Linux systems.
As of this writing, the X86 based single board computers that are available for online purchase are:
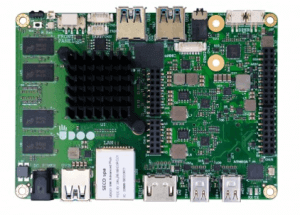
- UDOO X86 II Board (Recommended and tested by CMT)
- LattePanda from DFROBOT
- UP Board from AAEON
All the boards mentioned above are theoretically able to work with CMT VNA software. However, UDOO X86 II Board is the best option among them because it has a better processor and an Arduino built in which can be utilized to do other tasks. It has also been tested by CMT and confirmed to work perfectly with CMT USB VNAs. Next, we will go through the process for setting up the UDOO X86 II board with CMT VNAs as an example.
The UDOO X86 II Advanced Plus board has Intel Celeron N3160 2.24 GHz processor, 4 GB RAM and a 32 GB eMMC non-volatile storage. 3 USB ports and an HDMI port. The 32 GB storage on-board is more than enough for us to put a Linux operating system on it. If a Windows operating system is desired, the 32 GB storage would not be enough but UDOO board also has M.2 slot for extra SSD storage.
This board is available at https://shop.udoo.org/usa/x86.html and also at major electronics distributors such as Mouser and Digikey. The official UDOO board shop has a lot of accessories that you can buy together with the board such as M.2 SSD and power supply for the board.
Items needed for setup
- UDOO X86 II single board computer and a 12V, 3A power supply for it (sold separately)
- Empty USB stick with at least 4 GB storage space
- A PC that has internet connection
- A USB keyboard and a USB mouse for the UDOO board
- A computer monitor that has an HDMI port and an HDMI cable
- A USB hub (optional)
- A USB WIFI adapter compatible with Linux, for example
Operating System Installation
In this example, we are going to install Linux Mint on the UDOO X86 single board computer:
- Go to https://linuxmint.com/download.php to download a disk image file for the newest Linux Mint distribution, preferably an LTS version. The UDOO X86 II board has a 64-bit processor.
- Create a bootable USB stick: Go to https://www.balena.io/etcher/ and download the BalenaEtcher. This program will create a bootable Linux OS on a USB stick. Install BalenaEtcher at your favorite location and run the etcher. Make sure to select the right USB device:

- After the Etcher shows the flashing is finished, disconnect the USB drive and connect it to the UDOO board.
- Provide the UDOO board with 12 V power supply, a keyboard, a mouse and a monitor. Plug the WIFI adapter into the board and connect to WIFI. Because the UDOO board only has 3 USB ports. Here is where a USB hub comes in handy. The board will turn on automatically when power is supplied. With the USB stick plugged in, the board will boot from the USB drive.

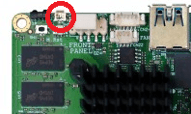
(UDOO board has a power button at the upper left corner of the board) - When the UDOO board successfully boots from the Linux Mint bootable USB drive, we will see a Linux Mint desktop. To install the operating system on the board, click on “Install Linux Mint” at the upper left corner.
- During the installation, we recommend checking “install third party drivers.”
- Select “Erase disk and install Linux Mint” and “Continue.”
- Follow the installation instructions and remember the password we set when asked. It will be useful later. After the operating system is installed, remove the USB drive.
CMT VNA Software Installation
- Now we have an operating system on the UDOO board. We need to install VNA software. Go to https://coppermountaintech.com/demo-the-software/ and download the free Linux VNA software for your instrument. This example shows the installation of RVNA software.
- The downloaded Linux version software is an appimage file type. We need to change the name and add executable permission to this file. Change the name to an easier name such as “RVNA”. Note that the .appimage file extension can be deleted. To do this, open a terminal inside the “Downloads” folder by right clicking inside the folder and select “Open in terminal.” Type mv CMT_RVNA_19.1.1_x86_64.appimage RVNA
- Then type
sudo chmod +x RVNA
This adds the executable permission to the file. It will ask for a password, this password is the one we set during the installation of Linux Mint.
- It is recommended to move the USB VNA software to /usr/local/bin directory because it is a great way to keep the software organized and this directory is a default path for the operating system to search for programs. To do this, type
sudo mv RVNA /usr/local/bin
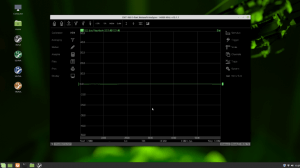
- At this point, the installation is complete, and you can run the RVNA software through terminal by simply typing “RVNA”
- It might be very helpful to create a desktop icon to launch the software. To do this, first we need an icon for the VNA software which can be downloaded by right clicking on the individual VNA software icons on the CMT Software download page and “save image as.” Create an “icon” folder under “Documents” and save the image there. Right click on the desktop and select “create a new launcher here.” Click on the icon and then browse to find the downloaded RVNA icon. Put “RVNA” as name and put “RVNA” for command, and then click “OK.”
- All done! Now double click the RVNA icon on the desktop and connect a USB VNA to make measurements.