


Copper Mountain Technologies provides a variety of Vector Network Analyzers and VNA software to accommodate a wide range of test and measurement needs.
Our product line is broadly divided into 4 types: 1-port VNAs or reflectometers and 2-port 1-path VNAs make S11 and S21 measurements only using CMTVNA software, instruments capable of full 2-port measurements (there are the M, S, SC, and Cobalt series VNAs) using S2VNA software, and full 4-port VNAs using S4VNA software.
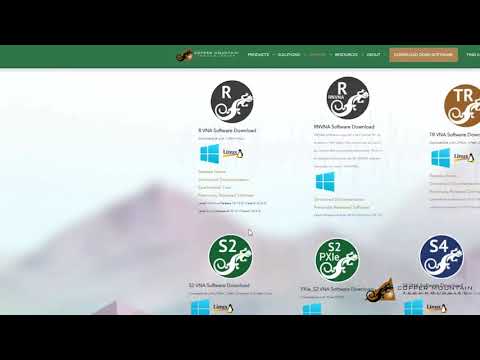
To download the software, go to https://coppermountaintech.com/demo-the-software
Watch the video for full details on how to download and use the VNA software.
Use the steps below or watch this video to troubleshoot your VNA connection.
First, make sure that the VNA is powered ON and the USB cable is connected to both your VNA and your PC.
For Legacy software:
Next, launch the VNA software and make sure that it is not in Demo Mode. To check this, use the following softkeys “System > Misc Setup > Demo Mode > OFF.
The bottom right corner of the software reads the status of the device. This usually reads as either Ready or Not Ready. If the status says Ready, you can go ahead with your measurements.
For CMTVNA software:
Next, launch the VNA software and make sure that it is not in Demo Mode. To check this, use the following softkeys Settings > VNA Devices > Detected > Select and Connect to the device you have physically connected.
Check the status indicator in the bottom-left corner of the software:
Yellow light Not Ready, the device is not ready.
Green light Ready, the device is ready, and you can proceed with measurements.
However, if the status shows a yellow light (CMTVNA) or Not Ready (Legacy), there are a few ways to determine the cause:
Make sure that you are using the latest version of our software. To check the software version on your software, click on System -> About. If your software is out of date, you can download the latest version from our website coppermountaintech.com/download-free-vna-software/.(For Legacy software)
For CMTVNA software, make sure that you are using the latest version of our software. The software version is displayed in the bottom-right corner of the screen. If your software is out of date, you can download the latest version from our website coppermountaintech.com/download-free-vna-software/.
2. The next step is to Power Cycle the VNA and see if the status then changes to Ready. If you are unable to establish connection, continue performing the next steps.
3. Open the Device Manager in your PC and scroll down to Universal Serial Bus Controllers. Now, expand the drop down menu and check if your VNA is listed under this menu.
4. If your VNA is not listed under Universal Serial Bus Controllers, try using a different USB cable and then check the menu again.
5. If you are using a USB HUB and replacing the USB cable did not resolve the issue, try connecting your USB directly to your computer bypassing the hub.
6. Lastly, try connecting the VNA to a different computer, as some PC settings could be the cause of the connection issues.
If you are still having issues after all the steps above, contact support or call us at +1.317.222.5400.
Let’s discuss the two types of calibration – Annual Calibration and Measurement Calibration.
Annual calibration is used to check the instrument periodically to ensure that it is operating within its specifications. We recommend a 12-month calibration interval for all VNAs and ACMs (Automatic Calibration Modules); however, the actual calibration is determined by your organization’s quality policy. Our Indianapolis based calibration lab is accredited in accordance with the recognized international standard ISO/IEC 17025 (2017) and meets the requirements of ANSI/NCSL Z540-1994-1, ISO/IEC 9001:2008.
If you prefer to perform annual calibration yourself, or use a third-party lab, you can use any lab with RF measurement experience and capability. You may also download the VNA Performance Test (VNAPT) software from our website.
Measurement Calibration is needed to ensure that the loss associated with any connector or cable is accounted for when taking measurements on the Device Under Test.
SOLT, otherwise known as Short, Open, Load, Thru, is the most common calibration technique. Calibration can be done by either using a mechanical calibration kit or an Automatic Calibration Module, or ACM.
Watch the video to learn more about VNA calibration.
Our VNA software application offers a demo mode feature, which does not require a physical VNA to use. Demo mode is easy to access and allows you to simulate the use of various VNA models directly from the software. This mode is particularly helpful for students and new customers who are looking to learn more about our software. You can download our demo software on the website at any time for free.
Watch the video to learn more about using the software in simulation mode.
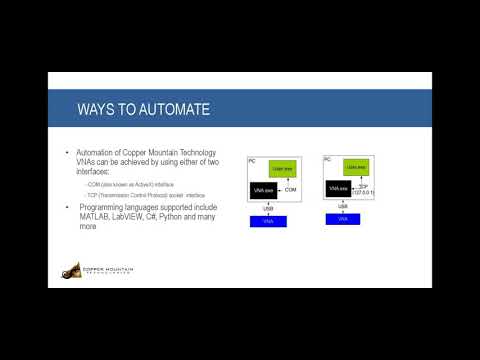
It is very easy to automate CMT VNAs. CMT VNAs support a huge list of available SCPI commands. Watch the video below for some beginning examples on automation. If you want more information on automating your vector network analyzer measurements, you can watch our VNA 101 Bootcamp webinar on automation here or read our guide for automating CMT VNAs here.
At first glance, VNADT and VNAPT can appear to be the same thing. But VNADT, or VNA Diagnostic Test, is a basic tool we provided by CMT to verify the functionality of your VNA or ACM. Our diagnosis test will guide you through various tests with step by step instructions. Some of these tests are manual and require input from the user, such as providing images of the VNA to check for external damage.
VNAPT, or VNA Performance Test, is an in-depth program that gauges the main performance parameters of the VNA and is typically used by authorized service centers and third-party calibration labs for evaluating the performance of your VNA after repair, or for providing ISO17025 accredited calibration.
If you are looking for software or documentation for your VNA, you can find it in a couple of ways. If you locate your VNA on the website, you can find these items under the software/documentation tab on the product pages. If you hover over the support tab on the navigation bar, you will see pages to Download Software, Download Files, Download Documentation, and about Automation. Watch the video to learn more.
There are a few simple steps to adding a calibration kit to the VNA software. Watch the video to learn how (for Legacy software)
To add a calibration kit to the CMTVNA software, go to Calibration > Edit kits > New kit and then enter the details of the Calibration kit.
The addition of four cables for each extender can make connections to the frequency extension modules confusing. Watch the video for step by step instructions on connecting the frequency extension modules to the VNA.
We are also often asked about connecting third-party extenders to a CMT vector network analyzer. The video below provides a step-by-step guide to connect and calibrate third-party extenders with a Cobalt VNA.
An ACM, or Automatic Calibration Module, is a fully automatic, USB-controlled and powered, electronic calibration module. It reduces the number of steps required in the calibration process. We have both 2 port and 4 port ACMs available. Using an Automatic Calibration Module greatly simplifies the calibration process by eliminating the numerous connections to each standard and reduces possible errors from those extra connections and steps. Learn all about using an ACM from the video.
Troubleshooting for VNA Not Connecting to the Software through USB
A file named vna-portable.rules under /etc/udev/rules.d/ is necessary for the USB connection with a VNA.
Navigate to this directory and check for a file named vna-portable.rules. It should only contain
four lines of code:
SUBSYSTEM==”usb”, ATTRS{idVendor}==”2226″, MODE=”0666″
SUBSYSTEM==”usb_device”, ATTRS{idVendor}==”2226″, MODE=”0666″
SUBSYSTEM==”usb”, ATTRS{idVendor}==”0547″, MODE=”0666″
SUBSYSTEM==”usb_device”, ATTRS{idVendor}==”0547″, MODE=”0666″
If this is not the case, manually edit it with the above four lines. (Note: Need to sudo)
After saving the file, to reload the udev rules, run:
sudo udevadm control –reload-rules && udevadm
If this fix does not work, delete the vna-portable.rules file completely and run the appimage file
again using sudo. Make sure no VNA is connected to the computer when the appimage file is
run.
Fix for Compatibility Issue with Linux 20 Versions
Linux 20 versions use a new font package which is not compatible with CMT’s Linux VNA
software. Thus, the font package needs to be rolled back to run the VNA software. To do this:
Download the v12 font package (fontconfig-config_2.12.6-0ubuntu2_all.deb) from: http://security.ubuntu.com/ubuntu/pool/main//f/fontconfig/
On this page, select a favorite server to download the .deb file.
Then install it by running:
sudo dpkg –install ~/Downloads/fontconfig-config_2.12.6-0ubuntu2_all.deb
Execute the following commands line by line:
cp -L -r /etc/fonts/conf.d /tmp/etc-fonts-conf.d
sudo apt install –fix-broken
sudo cp -L -r /tmp/etc-fonts-conf.d/* /etc/fonts/conf.d/
Go to /etc/fonts/fonts.conf and delete the lines at the top of the file that start with tags <its:> or <description>
Add this line to /home/<user name>/.bashrc:
export TERM=xterm
.bashrc is a hidden file which can be visible using command: ls -a
Finally, restart the terminal for the changes to take effect.
For Legacy Software: Copper Mountain Technologies’ VNA software application is only compatible with x86 devices. The CMT VNA application can still work with Linux, it is not limited to Windows operating systems. You will not be able to use ARM-based processors with our software.
We recommend UDOO boards for a single-board-based solution since it works on x86 architecture. More information on this product can be found here.
UDOO X86 II Board has been tested by CMT and is confirmed to work perfectly with CMT USB VNAs.
We have an application note on how to use CMT VNAs with a Single Board Computer, such as UDOO that you can read here.
For CMTVNA software:
You will be able to use ARM-based processors with our software.
You can access data sheets and extended data sheets for each product on their respective product page. For discontinued product data sheets, please visit the Download Files page, select the Data Sheet section, and once expanded, click on the Discontinued Products section.