

A Guide to CMT VNA Software Families and VNA Series
February 14, 2018Introduction
Copper Mountain Technologies (CMT) provides a variety of Vector Network Analyzers (VNA) and VNA software to accommodate a wide range of test and measurement needs. The CMT VNA family covers a wide span of frequencies starting from 20 kHz, and extending to 20 GHz, with 1-port, 2-port or 4-port configurations. 2-port VNAs are further divided into two groups: one capable of measuring 2-port 1-path measurements, and the other capable of full 2-port 2-path measurements.
The software app for each product family differs slightly from the others, in terms of configuration and appearance. This application note aims, for all of the CMT VNA products, to explain how to identify the product’s family and its corresponding software application.
CMT VNA Product Groups
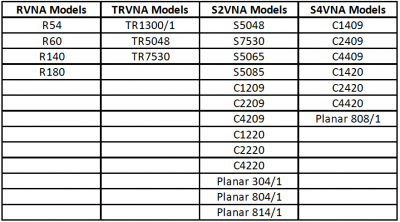
The CMT VNA product line is divided into 4 types: R, TR, S2 and S4. The R instruments are 1-Port Reflectometers, and the S4 group contains 4-port VNAs. The TR and S2 groups both contain 2-port VNAs. TR instruments are capable of 2-port 1-path measurements (S11 and S21 only) while S2 instruments are capable of 2-port, 2-path measurements.
The classification of all CMT VNAs, as of Q2 2018, according to the instrument type is shown in Table 1.

Table 1: Group membership of each CMT VNA.
Executable paths and COM server names
Each product group (TR, R, S2, and S4) is supported by its own VNA software application, named TRVNA, RVNA, S2VNA, and S4VNA respectively. Each of these applications contains a COM server that enables other programs to access its functionality. Automation of the VNA requires that the COM server be registered with Windows. The names of the built-in COM servers are shown in Table 2, as is the default install path of each VNA family’s application.

Software Installers of Each VNA Family
The installation wizards and configuration options differ slightly among the four families. In this section, the installation procedure for R, TR. S2 and S4 software family members will be demonstrated.
Installer: R and TR groups
A screenshot of the RVNA series software installer is shown in Figure 1.

Fig. 1: R installer.
- Select Analyzer Model: You can specify which analyzer model the software can connect to or you can allow the software to connect to any analyzer model within the family by choosing “Autodetect”. You can change this later by clicking “System -> Misc Setup->Analyzer Model”.
- Select Initial Analyzer Model: If you’ve selected “Autodetect” above, then you can specify which type of instrument is initially selected.
During the software installation, the demo mode can be enabled as shown in Figure 2.

Fig. 2: Enabling demo mode in RVNA software installer.
- Enable Demo Mode Check this box if you want the Software to have Demo Mode turned ON after installation. You can turn Demo Mode OFF later by clicking “System -> Misc Setup->Demo Mode”.
Installer: S2 and S4 groups
A screenshot of the S2VNA series software installer is shown in Figure 3.
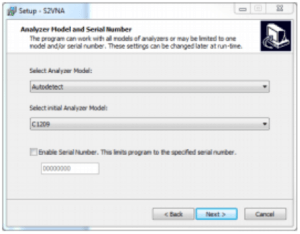
Fig. 3: S2 and S4 installer.
- Select Analyzer Model: You can specify which analyzer model the Software can connect to or you can allow the Software to connect to any analyzer model within the family by choosing “Autodetect”. You can change this later by clicking “System -> Misc Setup->Analyzer Model”.
- Select Initial Analyzer Model: If you’ve selected “Autodetect” above you can specify which type of instrument is initially selected.
- Enable Serial Number: If you want the Software to connect to only one specific instrument you can check this box and enter the serial number of that instrument.

Fig. 4: Enabling demo mode in S2VNA series software.
- Enable Demo Mode Check this box if you want the Software to have Demo Mode turned ON after installation. You can turn Demo Mode OFF later by clicking “System -> Misc Setup->Demo Mode”.
Enabling/disabling Demo (simulation) Mode
Demo/simulation mode of the VNA application can be enabled or disable after installation as well. The procedure and menu appearances differ slightly among the four families. In the following sections the demo mode selection procedure for R, TR. S2 and S4 software family members will be demonstrated.
Demo/simulation mode: R group
A screenshot of the RVNA software is shown in Figure 5.
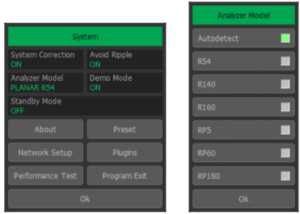
Fig. 5: A screenshot of R family software.
In order to switch between demo mode and measurement mode, follow the procedures:
- Click “System”.
- Click on “Demo Mode” to toggle ON/OFF demo mode (Note: Application will restart).
- Click on “Analyzer Model” to change which model is being simulated.
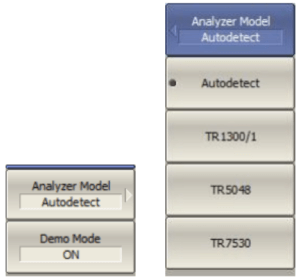
Fig. 6: A screenshot of TR family software.
In order to switch between demo mode and measurement mode, follow the procedures:
- Click “System -> Misc Setup”.
- Click on “Demo Mode” to toggle ON/OFF demo mode (Note: Application will restart).
- Click on “Analyzer Model” to change which model is being simulated.
Conclusion
This application note summarizes the families of each CMT VNA available as of Q1 2016, and identifies differences among installing the particular VNA application needed for all the instrument types. The names of the COM server and legacy aliases were enumerated and the procedure for selecting demo mode after the installation is complete were demonstrated.
For any questions regarding the VNA software application families, please don’t hesitate to contact us at support@coppermountaintech.com.