

1-Port VNA Setup: How to Verify Measurement Accuracy
September 16, 2026Table of Contents
How to Verify a VNA Measurement System Before Testing
Copper Mountain Technologies’ 1-Port Vector Network Analyzers are capable of making extremely accurate measurements, but only when the entire measurement system is functioning correctly. Many users assume that performing a calibration guarantees accurate results. In reality, VNA calibration only removes the systematic errors that exist within a properly functioning measurement setup. If a test cable is damaged, a connector is contaminated, the wrong calibration kit is selected, or the VNA itself has developed a problem, calibration cannot compensate for those issues. Good measurements therefore begin with proper VNA setup and measurement verification before calibration, including a careful check of the instrument and all the components that make up the measurement path.
The consequences of poor measurement practices can be surprisingly expensive. A defective test cable may cause a good device to fail production testing. An incorrect calibration kit definition can introduce measurement errors that lead engineers to redesign hardware unnecessarily. In research environments, inaccurate measurements can invalidate weeks of experimental work. Troubleshooting these problems often consumes far more time than the few minutes required to verify that the measurement system is operating correctly. A consistent setup verification procedure improves measurement confidence while reducing wasted engineering effort and production costs.
When unexpected results appear, it is important to determine whether the problem lies with the device under test or with the measurement system itself. A VNA measurement is only as reliable as every component between the instrument’s test ports and the DUT. The analyzer, test cables, adapters, connectors, calibration standards, and even environmental conditions all contribute to the final result. Separating instrument-related issues from measurement setup problems allows troubleshooting to proceed logically instead of relying on trial and error. Simple verification steps can quickly identify whether the VNA receivers, source, and measurement path are operating as expected before valuable time is spent investigating the DUT.
This application note presents a systematic workflow for verifying the complete VNA measurement system before making critical measurements. Beginning with simple receiver health checks, the procedure continues through cable verification, connector inspection, calibration selection, and post-calibration validation. By following these straightforward steps, users can establish confidence that both the VNA and the measurement setup are operating properly, allowing subsequent measurements to reflect the performance of the device under test rather than hidden problems elsewhere in the test system.
VNA Warm-up
Before verifying the measurement setup or performing a calibration, the VNA should be allowed to reach thermal equilibrium. Like all precision RF test equipment, a vector network analyzer contains signal sources, receivers, mixers, and frequency reference circuitry whose electrical characteristics change slightly as the internal temperature stabilizes. During the warm-up period, small variations in gain, phase, and frequency can occur, affecting measurement repeatability and long-term stability. Directivity of the directional bridge changes somewhat with temperature, introducing ripple to low-level S11 measurements. Although these changes are typically small, they become significant when making high dynamic range measurements or comparing results over time.
Most VNAs require approximately 30 to 45 minutes of warm-up after power-up to achieve their specified performance. During this period, the instrument’s internal temperature gradually stabilizes, allowing the RF circuitry to settle into its normal operating condition. Performing a calibration before the analyzer has fully warmed up can result in a calibration that slowly drifts as the instrument continues to stabilize, reducing measurement accuracy throughout the remainder of the test session.
The surrounding environment is equally important. Ideally, the ambient temperature should remain relatively constant during both calibration and measurement. We suggest holding the ambient temperature within ± 1 degree C to achiever lab grade performance. Rapid temperature changes caused by direct sunlight, HVAC airflow, or moving the instrument between environments can alter the electrical length of cables and connectors and slightly change the characteristics of internal components. Even high-quality test cables expand and contract with temperature, producing measurable phase changes at microwave frequencies. Maintaining a stable laboratory environment minimizes these effects and improves measurement repeatability.
For the most consistent results, power on the VNA at least 30 minutes before use, verify that the ambient temperature is stable, and avoid disturbing the instrument or measurement setup once calibration has been completed. Spending a few minutes ensuring thermal stability provides a solid foundation for every measurement that follows.
Inspect the Hardware
Before powering through a calibration, carefully inspect every component that will become part of the measurement system. A vector network analyzer can only measure as accurately as the hardware connected to its test ports. In practice, many measurement problems are not caused by the instrument itself, but by worn, contaminated, or damaged connectors somewhere along the signal path. A thorough inspection takes only a minute or two and is one of the simplest ways to improve measurement accuracy and repeatability.
Begin with the VNA test port. Examine the connector interface under good lighting, paying close attention to the center conductor, dielectric, and coupling threads. The center conductor should be properly aligned and free from damage or deformation, while the threads should engage smoothly without signs of excessive wear or cross-threading. Damage to a VNA test port is often expensive to repair and can compromise every measurement made on that port.
Next, inspect the test cable. Because test cables are repeatedly flexed, connected, and disconnected, they are among the most common sources of measurement problems. Check both connector interfaces for cleanliness and mechanical damage, and verify that the connectors rotate freely without looseness. Any adapters that will remain in the measurement path should receive the same careful inspection, since every additional interface has the potential to introduce mismatch and uncertainty.
The calibration standards deserve equal attention. The Open, Short, and Load standards define the reference plane for the entire calibration process. If one of these standards is contaminated or damaged, the resulting calibration will faithfully incorporate that error into every subsequent measurement. Verifying the condition of the calibration standards before use is therefore just as important as selecting the correct calibration procedure.
As each component is inspected, look for contamination such as dust, fingerprints, oil, or metal particles. Even microscopic debris can prevent proper metal-to-metal contact and create measurable reflections at microwave frequencies. Also examine the center conductors for bending, recession, or other physical damage, inspect the connector threads for wear, and verify that there are no loose or wobbly connector bodies. Mechanical defects that seem insignificant at low frequencies can produce surprisingly large errors as frequency increases.
If contamination is present, clean the connector using techniques intended for precision RF interfaces. High-purity isopropyl alcohol and lint-free cleaning tools are generally recommended. Avoid ordinary cotton swabs, as many contain adhesives beneath the cotton that can dissolve in alcohol and leave residue inside the connector. Never use excessive force or abrasive materials, since scratching the connector interface can permanently degrade its performance.
When assembling the measurement setup, tighten every connection using the proper torque wrench for the connector type. Under-tightened connectors may produce inconsistent electrical contact and poor measurement repeatability, while over-tightening can permanently damage the connector interface. Applying the manufacturer’s recommended torque ensures consistent mechanical engagement and minimizes connector wear, resulting in more accurate and repeatable measurements throughout the life of the instrument and accessories.
Perform a Receiver Health Check
Before connecting the test cable or beginning a calibration, it is good practice to verify that the VNA itself is operating correctly. If the 1-port model supports absolute receiver measurements, a receiver health check is a quick diagnostic that confirms the instrument’s source and receiver hardware are functioning as expected. By performing this check before any external hardware is connected, you can distinguish problems originating within the VNA from those caused by cables, adapters, or other components in the measurement setup.
To perform the check, remove the test cable from the VNA so that the test port is left unconnected. Preset the VNA and set the source power to 0 dBm (if it isn’t already) and configure the display to show 2 traces, absolute measurement reference receivers R, and test receiver A (or R1(1) and T1(1) in the CMTVNA UI software). It is best to allocate the traces to two diagrams on the screen as shown below. No calibration is needed for this test.

Figure 1 – Receiver Health Check
The receivers should indicate approximately 0 dBm. Small variations of a few dB are normal, but the readings should remain stable and close to the programmed source power. Large deviations, excessive noise, or unstable readings indicate that the instrument should be investigated before proceeding with calibration or measurement. Typical receiver failures are not subtle. An entire receiver over all or part of a band will show a drastic discontinuity if there is a failure.
Although this is a simple test, it verifies several critical functions simultaneously. First, it confirms that the source is producing the programmed output power. Second, it verifies that the reference receiver is accurately monitoring the source signal. Third, it confirms that the test receiver is operating correctly and measuring the expected signal level. Finally, because the signal must travel through the VNA’s internal RF distribution network before reaching the receivers, the test also provides confidence that the instrument’s internal signal path is functioning properly. Be sure to save a “Receiver Check” state file for future use.
Performing a receiver health check takes less than a minute, yet it can quickly identify instrument-related problems before valuable time is spent troubleshooting the measurement setup or the device under test. Once the receiver readings have been verified, you can proceed with confidence to inspecting the external measurement path and performing the calibration.
Check the Test Cables
Before connecting a device under test, verify the integrity of the test cable. Connect a precision load to the test cable and measure S11. The reflection should remain stable and close to the expected return loss of the load. While observing the trace, gently flex the cable along its length and near each connector. A high-quality cable should exhibit little or no change. Any significant movement in the trace may indicate a damaged cable, worn connector, or intermittent internal conductor. Verifying the cable in this manner ensures that the measurement system is free of cable-related faults before calibration or DUT testing begins.
If a cable does exhibit significant changes, the source of the problem can be resolved by putting the VNA in time domain mode. Without any calibration, the zero time point is at the VNA output. Set the number of points to 1,000 and in the Analysis menu, choose Time Domain. Turn Time Domain on and set the start time to 0 and the velocity factor to 0.67 for PTFE dielectric test cables. Set the reflection type to “one-way”. Choose units of feet or meters. Now with the load on the end of the cable, move the cable about and see where the “blips” on the screen increase and decrease. This is the location of the cable problem with respect to the VNA output port as indicated in feet or meters at the bottom of the screen. The peak of the blip indicates the size of the reflection at that point. A blip at -10 dB would dominate and give the cable a 10 dB return loss, best case, which is quite awful.
Configure the Measurement
Once the measurement system has been verified, configure the VNA for the specific device under test. At this stage, the DUT should already be connected so the measurement parameters can be optimized for the response you want to capture. Select a frequency range that fully encompasses the operating band of interest, including any expected resonances, passbands, or stopbands. Choose an appropriate number of sweep points to provide sufficient frequency resolution without unnecessarily increasing measurement time. Set the IF bandwidth to achieve the desired balance between sweep speed and measurement noise, remembering that narrower bandwidths reduce the noise floor at the expense of longer acquisition times. Adjust the source power to ensure the DUT is driven appropriately without causing compression or other nonlinear effects. Finally, select the display formats that best present the desired information, such as logarithmic magnitude, phase, Smith chart, VSWR, or group delay. Taking the time to optimize these settings with the DUT connected ensures that the measurement captures the required performance characteristics accurately and efficiently.
Perform Calibration
Calibration removes systematic measurement errors so that the reported S-parameters accurately represent the device under test. The appropriate calibration method depends on the required accuracy.
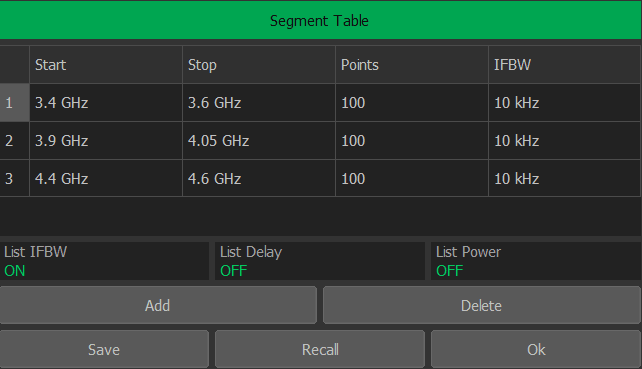
Figure 2 – 1 Port Calibration Menu
For a one-port calibration, the user may measure any single calibration standard, any pair of standards, or all three. Full One-Port calibration requires correction of Directivity, Source Match, and Reflection Tracking. Measuring the Open and the Short without the Load corrects Source Match and Reflection Tracking but not Directivity. Measuring the Open and Load or Short and Load corrects Directivity, partially corrects Reflection Tracking and leaves the Source Match uncorrected. For reflection measurements, it is essential to correct Directivity to prevent unacceptable ripples in measurements. Open or Short alone, or both together do not correct it. The systematic errors corrected by each calibration combination are summarized in Table 1.
Table 1. Systematic error terms corrected by each one-port calibration option.
Table 1 – Partial and Full 1-Port Calibration
Calibration | Directivity | Source Match | Reflection Tracking |
Open | ✖ | ✖ | Partial |
Short | ✖ | ✖ | Partial |
Load | ✔ | ✖ | ✖ |
Open + Short | ✖ | ✔ | ✔ |
Open + Load | ✔ | X | Partial |
Short + Load | ✔ | X | Partial |
Open + Short + Load (SOL) | ✔ | ✔ | ✔ |
.
For the highest accuracy, use an Automatic Calibration Module, or ACM. The ACM uses individually characterized, data-based standards rather than relying on generalized polynomial standard definitions. Because the actual behavior of each internal standard is represented by thermally corrected, measured characterization data, the calibration can achieve substantially lower residual error than a conventional mechanical kit. For example, an ACM can provide approximately 47 dB of effective directivity, which represents a major improvement in the practical accuracy of reflection measurements. Effective directivity is the fundamental floor for reflection accuracy, so this difference is especially important when measuring devices with very low reflection coefficients or high return loss.
Verify the Calibration
After calibration has been completed, the measurement system should be verified before connecting the device under test. The best method is the ACM Confidence Check, which provides a rapid and highly sensitive verification of the entire calibrated measurement system. Only one port of the ACM is used and it is not necessary to apply a load to the other port.
The Confidence Check uses an internal 20 dB attenuator contained within the ACM. Although this attenuator is not intended to be a precision verification standard, it has been thoroughly characterized at the factory, and its measured response is stored within the ACM. During the Confidence Check, this factory measurement is loaded into the VNA’s memory, and the instrument immediately measures the same attenuator through the current calibrated setup. Because the same device is being compared against its own factory characterization, the quality of the attenuator itself is largely irrelevant. What matters is how closely the live measurement matches the stored reference.

Figure 8 – 1 Port Confidence Check
The two traces should closely overlay one another. Any significant deviation indicates a problem with the calibration or measurement setup that should be investigated before proceeding. Keep in mind that this is a return loss measurement, where even differences of a few decibels below approximately −25 dB represent extremely small changes in the reflection coefficient. Consequently, what may appear to be a noticeable separation on the display often corresponds to only a very small measurement error. Figure 8 shows Data/Memory which allows for zooming in on the results. It shows only a few tenths of a dB of difference between data and memory, so this calibration is excellent.
The Confidence Check is also an excellent method for verifying mechanical stability. While observing the comparison traces, gently move the test cables and connectors. The measured response should remain essentially unchanged. If the traces move noticeably, the system may have a damaged cable, worn connector, or poor connection that should be corrected before making measurements.
If an ACM is not available, the calibration can be verified using a known return loss standard. One simple verification standard can be fabricated by terminating one end of a precision attenuator with a short circuit. For example, shorting a 6 dB attenuator produces a return loss of approximately 12 dB. Measure this standard using a carefully calibrated VNA and save the resulting Touchstone file as a reference. During future calibrations, load the reference measurement into the memory trace and compare it with the live measurement using the Data/Memory display format. The two traces should closely overlay one another. The objective is not to verify the attenuator itself, but to confirm that the calibrated measurement system is producing accurate, stable, and repeatable results before connecting the device under test.
Avoid Disturbing the Setup
Once the calibration has been completed and verified, the measurement setup should be disturbed as little as possible. Calibration is valid only for the electrical characteristics of the test system at the moment it was performed. Any change to the cables, connectors, or adapters can alter those characteristics and reduce measurement accuracy.
Avoid unnecessary movement of the test cable, particularly near the connectors where bending produces the greatest mechanical stress. Even phase-stable cables exhibit small changes in phase and amplitude when flexed, while standard test cables can produce much larger measurement errors. If the cable must be repositioned, do so gently and consistently, and verify that the movement does not affect the measurement.
Connector repeatability is equally important. Every connection should be clean, properly aligned, and tightened to the manufacturer’s recommended torque using a calibrated torque wrench. Repeatedly disconnecting and reconnecting the DUT or adapters can introduce small variations in connector geometry that increase measurement uncertainty.
For extremely high-precision measurements, many engineers take additional steps to ensure the cable remains completely stationary after calibration. A common practice is to tape the test cable to the bench or use a cable support, often called a cable trapeze, to suspend the cable and relieve mechanical stress on the test port. These techniques help maintain a constant cable geometry throughout the measurement, minimizing phase and amplitude changes caused by cable movement.
Good bench practices further improve measurement repeatability. Support heavy cables so they do not pull on the test port, avoid placing tools or equipment on the cable, and ensure that adapters and fixtures remain mechanically stable throughout the measurement. By minimizing disturbances after calibration, you preserve the integrity of the calibrated reference plane and obtain the most accurate and repeatable measurements possible.
Recalibration Guidelines
A calibration remains valid only as long as the electrical characteristics of the measurement system remain unchanged. Whenever those characteristics are altered, the calibration should be repeated to maintain measurement accuracy.
Recalibration is required whenever a test cable, adapter, or fixture is added, removed, or replaced, or whenever any component is inserted into or removed from the calibrated measurement path. Any change to the electrical path between the VNA test port and the DUT invalidates the existing calibration and requires a new one. Likewise, if the test cable has been significantly moved or stressed after calibration, particularly during high-accuracy measurements, recalibration may be necessary.
Environmental changes can also affect measurement accuracy. Large temperature changes, long measurement sessions, or situations where the instrument has not yet reached thermal equilibrium may gradually alter the characteristics of the measurement system. If the VNA or test setup has experienced a significant temperature change, allow the system to stabilize before recalibrating. The VNA can display its internal temperature which tracks the ambient temperature. This can be used to evaluate temperature drift. It is advisable to maintain ambient temperature within ± 1 degree Celsius to achieve lab-grade results. Consistent air flow around the VNA can help prevent the influence of localized heat sources.
Finally, recalibration should be performed whenever there is any doubt about the validity of the existing calibration. If an ACM Confidence Check or an independent verification measurement no longer produces the expected results, or if the measurements simply do not appear reasonable, recalibration is often the fastest and most reliable way to restore confidence in the measurement system. Even if the Confidence Check confirms that the calibration is still valid, consider performing a fresh calibration if the ACM is already connected. Since the device under test has already been disconnected and the ACM is in place, recalibration requires only a few additional seconds and provides the assurance that the measurement system is operating with the most recent calibration. In most situations, it is far more efficient to spend a few seconds recalibrating than to spend hours investigating questionable measurement results.
Advanced Measurement Features
Segmented Sweep
Segmented sweeps provide a powerful method for reducing measurement time without sacrificing accuracy where it matters most. Rather than applying the same sweep settings across the entire frequency range, a segmented sweep divides the measurement into multiple frequency regions, each with its own independently configurable parameters. Every segment can have its own frequency limits, point density, source power, and IF bandwidth, allowing the measurement to be optimized for the behavior of the DUT.
For example, when characterizing an antenna, high point density and a narrow IF bandwidth may only be required around the resonant frequency. Outside the resonance, fewer points and a wider IF bandwidth significantly reduce measurement time while preserving the information of interest.
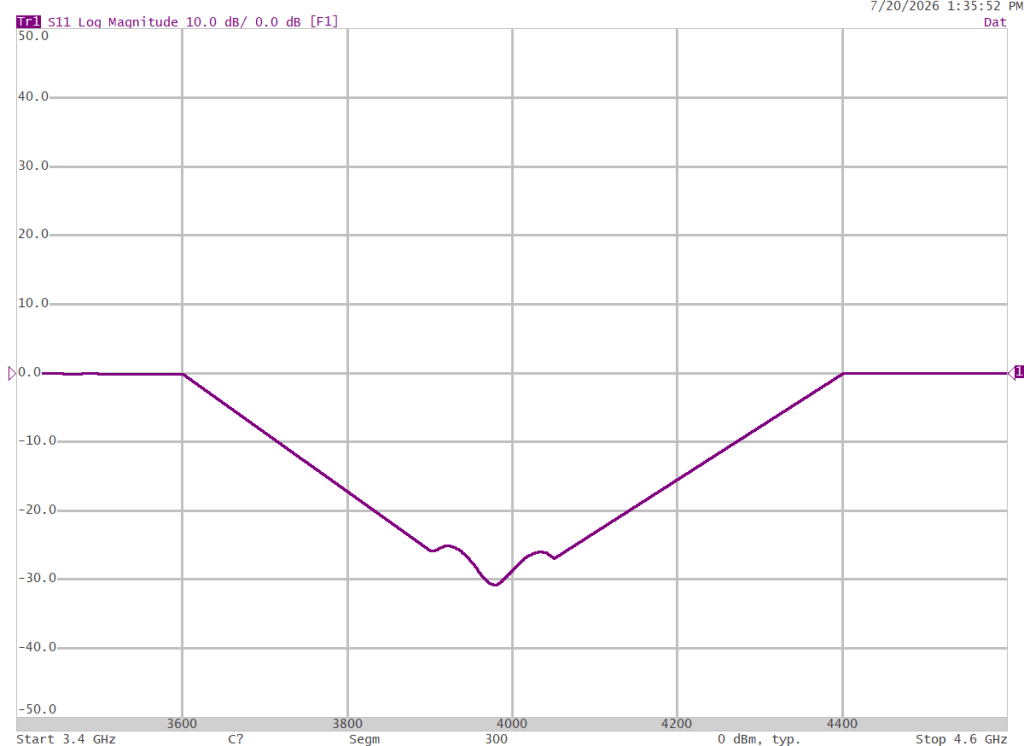
Figure 2 – Segmented Sweep of an Antenna
Figure 3 – Segment Setup
In this way, 100 points are dedicated to each section. The number of points assigned to each segment need not be equal. Notice that straight lines connect each segment to the next.
Multiple Channels
Multiple channels allow a single VNA to perform several independent measurements simultaneously. You can think of each channel as a separate virtual VNA, with its own complete set of measurement parameters and display configuration. Changes made to one channel do not affect the others, making it possible to optimize each measurement for a different purpose.
Each channel can have its own frequency range, sweep type, source power, IF bandwidth, calibration, trace configuration, and display format. One channel might display return loss across the full operating band while another zooms in on the resonant frequency using a much narrower span and higher point density. A third channel could display impedance on a Smith Chart while a fourth displays VSWR. Configuring these measurements once allows the user to move between different views of the DUT without continually reconfiguring the analyzer.

Each channel must be calibrated separately. Note how the top channel is calibrated in Figure 4 and the bottom channel is uncalibrated.
Limit Lines
Limit lines provide an automated method for determining whether a device meets its performance specifications. Rather than relying on an operator to visually inspect each trace, the VNA continuously compares the measured response against predefined measurement masks and reports an immediate pass or fail result. This eliminates subjective interpretation and ensures that every device is evaluated against exactly the same acceptance criteria.
Limit lines can be defined for virtually any measurement that can be displayed by the VNA, including return loss and VSWR. Multiple upper and lower limits may be applied to a single trace, allowing different performance requirements to be enforced across different frequency regions. When combined with multiple channels, each measurement can have its own independent limit lines and pass/fail criteria, providing comprehensive automated testing in a single measurement sequence.
The accompanying figures illustrate this capability. In the first image, S11 passes the minimum return loss test. In the second image, the return loss no longer meets the required limit. The VNA immediately identifies this condition and reports a fail, eliminating the need for manual interpretation. This type of automated pass/fail testing is invaluable in production environments, where it improves throughput, reduces operator error, and ensures consistent product quality.

Figure 5 – Passing Limit Test

Figure 6 – Failing Limit Test
Conclusion
Accurate VNA measurements are the result of following a disciplined, repeatable workflow. Each step builds upon the previous one to ensure the measurement system is operating correctly before connecting the device under test.
- Warm up the VNA.
Allow the instrument to reach thermal equilibrium for maximum stability.
- Inspect all measurement hardware.
Verify that test cable, connectors, adapters, and calibration standards are clean and undamaged.
- Verify the two receivers.
Confirm that the internal receivers and source are operating correctly before connecting any external hardware.
- Verify the test cable.
Check that the cable exhibits the expected response and remains stable when lightly flexed.
- Configure the measurement.
Set the frequency range, sweep parameters, source power, IF bandwidth, and display layout.
- Add the required traces.
Display all measurements needed for the application.
- Select the required S-parameters.
Choose the appropriate reflection and transmission measurements for the device under test.
- Create additional channels only when necessary.
Use multiple channels only when different measurement conditions, such as frequency range, power, IF bandwidth, or sweep type, are required.
- Perform the appropriate One-port calibration.
Select the calibration method that provides the accuracy required for the measurement.
- Verify the calibration.
Confirm that the calibrated measurement system is performing as expected before testing the DUT.
- Preserve the calibrated setup.
Avoid disturbing cables, adapters, and fixtures. Maintain the natural bend of the test cables to maximize measurement stability.
- Recalibrate whenever the measurement path changes.
Replace or move a cable, change an adapter or fixture, experience significant temperature changes, or fail calibration verification, and the system should be recalibrated.
Following this workflow minimizes measurement uncertainty and maximizes the accuracy, repeatability, and confidence of every one-port VNA measurement.
