The Analyzer ensures steady power level at the test port with the specified accuracy. The power level is defined between the instrument’s minimum and maximum output power level.
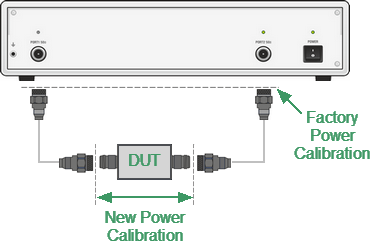
A DUT is connected to the Analyzer by cables (see figure below), which have some losses. The power calibration allows to maintain a more accurate power level at a DUT input, adjusted to the use of the cables.
Power Calibration
The power calibration is performed by an external power sensor connected to the cables’ ends, which will be later connected to the DUT (see figure below). Calibration can be single-pass or multi-pass.
Multi-pass calibration
Multi-pass calibration calibrates the port power with a specified tolerance. In this case, calibration is carried out several times until the specified tolerance is achieved. The pass count limit is set in the range of 2 to 10.
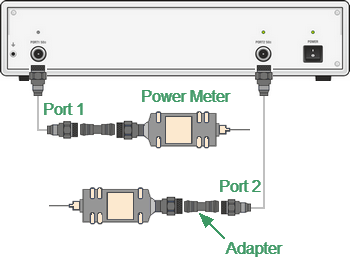
Power Calibration with external power sensor
After the power calibration is complete, power correction automatically turns on. Later it is possible to disable or enable again the power correction function.
note |
If an adapter or other accessory is used when connecting the power sensor to the measurement port, the losses introduced by the adapter or accessory are compensated by the Loss Compensation function. |
The power calibration is performed for each port and each channel individually.
note |
The power correction status is indicated in the trace status field (See Trace Status Field) and in the channel status bar (See Channel Status Bar). |
Loss Compensation Table
The loss compensation function allows to apply compensation for unwanted losses produced between the power sensor and the calibrated port in the process of power calibration. Define the losses, which are needed to compensate in the table specifying frequency and losses (See figure below).
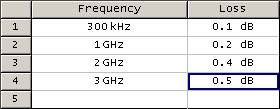
Loss compensation table
Linear interpolation will be applied to the losses in the intermediary frequency points. The loss compensation table is defined for each port individually.
note |
To have the losses compensated for, enable this function and fill out the table before starting the power calibration procedure. |
Loss Compensation Table Editing
If the loss compensation needs to be applied, enable this function and fill out the table before starting the power calibration procedure. Fill out the table for each port individually.
|
To add a new row to the loss compensation table, use the following softkeys: Calibration > Power Calibration > Loss Compen > Add A new row will appear under the highlighted one. |
|
To delete a highlighted row, use the following softkeys: Calibration > Power Calibration > Loss Compen > Delete |
|
To clear all the table, use the following softkeys: Calibration > Power Calibration > Loss Compen > Clear Loss Table |


|
To save the table into a *.LCT file on the hard, use the following softkeys: Calibration > Power Calibration > Loss Compen > Export Loss Table |

|
To open the table from a *.LCT file from the hard, use the following softkeys: Calibration > Power Calibration > Loss Compen > Import Loss Table |
|
Enter frequency and loss values into the table, scrolling by navigation keys. |
|
To enable the loss compensation function, use the following softkeys: Calibration > Power Calibration > Loss Compen > Compensation |
|
|
Power Calibration Procedure
Perform connection and setting of an external power sensor as described in Power Sensor Setting. Connect the sensor to one of the test ports of the Analyzer and perform calibration as described below. Then repeat the calibration for the other test port.
|
To select the calibrated port number, use the following softkeys: Calibration > Power Calibration > Select Port |
|
To zero power sensor, use the following softkeys: Calibration > Power Calibration > Power Sensor > Zeroing |
|
|
note |
The power sensor can be connected to the port, as during zero setting the output signal of the port is turned off. |
|
To enable multi-pass power calibration, use the following softkeys: Calibration > Power Calibration > Multi-pass Cal If enabled, set the required tolerance and calibration pass count limit for the mode. |
|
To set the calibration pass count limit for a multi-pass calibration, use the following softkeys: Calibration > Power Calibration > Pass Count Limit |
|
To set the tolerance (deviation from the target calibration level) for a multi-pass calibration, use the following softkeys: Calibration > Power Calibration > Tolerance |
|
To execute power calibration, use the following softkeys: Calibration > Power Calibration > Take Cal Sweep |

|
|
note |
After the power calibration is complete, power correction automatically turns on. |
Power Correction Setting
|
To enable/disable power correction, use the following softkeys: Calibration > Power Calibration > Correction |

|
|
Check Power
|
To check the result of the power calibration, use the following softkeys: Calibration > Power Calibration > Check Power A trace of the selected port's power will be displayed on the screen. |