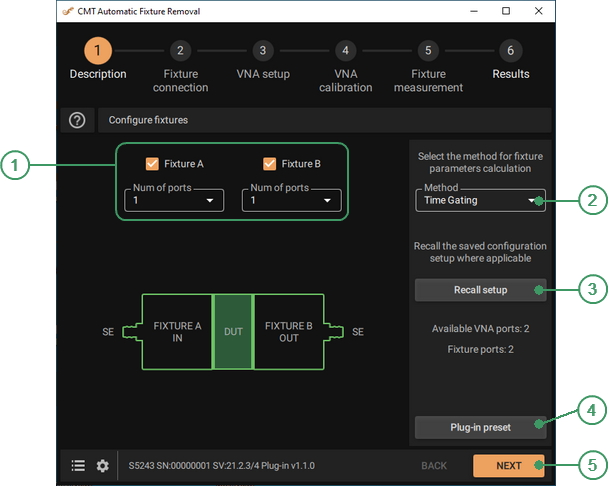
The first step Description allows to select the configuration of the fixture with a DUT, as well as the correction method of calculating the fixture parameters (See figure below).
On this step, the following is to be confirmed:
•The selected configuration Fixture A – DUT – Fixture B corresponds to the actual DUT configuration.
•The Analyzer has enough ports for connection.
Also, make sure that the types of Analyzer test port connectors match the fixture connectors.
NOTE |
The fixture is the device to which the DUT will be connected at the time of measurement. It is assumed that the user does not have a calibration kit to calibrate the Analyzer in the connection plane of the DUT. This version of the plug-in works only with Single Ended (non-differential) ports. This is shown in the figure as SE. |
Description
|
|
Fixture A (B) Area Select the required number of Fixture A (B) port(s) from the list. If Fixture A (B) will not be used, it can be disabled. |
|
|
Method Drop-down list Select the appropriate method for calculating fixture parameters from the list. |
|
|
Recall setup Button Click this button to load the previously saved configuration file with the *.STA extension. The next step is to perform fixture measurement on the Fixture measurement tab. The configuration file describes the behavior of the controls in the Fixture description, Fixture connection, VNA setup and VNA calibration tabs, and contains: •Analyzer settings. •Calibration results. •Plug-in settings on the listed tabs. After loading the configuration file, all that remains is to measure the fixture parameters and immediately start measuring the DUT. |
|
|
Plug-in-preset Button Click this button to reset the plug-in. CAUTION. The preset deletes all measured data without saving it and returns the plug-in to its initial state. The message about this will appear. The selected action must be confirmed. |
|
|
NEXT Button Click Next button to move to the next step. |


Warning |
If the selected number of Fixture A and Fixture B ports exceeds the available number of Analyzer ports, the plug-in will report a warning. Ignoring this warning will result in incorrect measurement results for future measurements. The plug-in tracks errors related to incorrect actions or calculations. Remember that with a Critical error icon Calculation errors, and status messages about saving and loading files, or about setting default plug-in parameters, are displayed in the Notification Panel. |

Instruction
1.Check that the number of Analyzer ports is sufficient to connect the DUT in the fixture.
Also, make sure that the types of Analyzer test port connectors match the fixture connectors.
2.Select the required number of Fixture A port(s) from the list. If Fixture A will not be used, it can be disabled.
3.Select the required number of Fixture B port(s) from the list. If Fixture B will not be used, it can be disabled.
4.Select the appropriate method for calculating fixture parameters from the list.